How I created a semantic Q&A bot for >13k recorded dreams using OpenAI, Langchain and Elasticsearch
I have been fascinated with dream interpretation for a long time. So, over the weekend I decided to create a database of >13k recorded dreams I scraped from the web. The database allows me to perform semantic searches rather than just plain-text searches, and beyond that it even allows GPT-enabled question answering. For example, I can ask the Q&A bot questions like: “Please search all dreams containing animals, and give me a list of their activities.” Not only does the bot have an understanding of what constitutes an animal (deer, elephant, snake, spider…), but it provides ChatGPT-like, meaningful answers in the style of ChatGPT. Here’s how I did it.
Honoarable mention goes to Dylan Castillo whose tutorial inspired me to do so.
These were the steps I had to take:
- Create a Selenium-based web scraper to scrape >13k dream reports
- Install Elasticsearch on my laptop to store the embeddings vectors
- Create vectors for all dreams using the OpenAI embeddings API and Langchain, then index all vectors in my local Elasticsearch instance
- Create a semantic search engine and a semantic Q&A bot
Here’s the tech stack I was using:
- Python v3.11 (although 3.10 would also have been sufficient, I guess)
- Elasticsearch v8.8.1 (minimum is v8.0)
- Langchain v0.0.196 (one day later Langchain’s version is already at v0.0.198…)
- OpenAI APIs
- My MacBook Pro 2015 with 16 GB memory and Intel i7 2.8 GHz Quad-Core CPU
Let’s look into these steps in more detail.
Step 1: Create a Selenium-based web scraper
There are various online forums where users can post their dreams publicly and engage in discussions on their meanings. I will not go into too much details on how to scrape them as you can easily find many tutorials out there, but automation with Selenium definitely is your friend.
The websites I scraped from were not always stable. Quite frequently, the sites did not respond and timed out for otherwise well-functioning URLs. Hence, I had to keep a list of already scraped sites. I only chose websites that used forum software with standardised HTML tags upon which I could rely to extract the actual text content of the dream. One assumption was that the first post in a discussion thread would typically contain the description of the dream itself. Obviously, this assumption might not always be true, but for my fun project this level of accuracy was more than enough.
During the scraping I made sure that I also stored some metadata on each reported dream, like the post’s date and time, the author’s nickname if publicly available, the exact URL, a running ID for each dream, and a few more details.
In total, I created a local dataset with >13k dreams with a sufficient quality to obtain some useful results.
Step 2: Install Elasticsearch and Kibana v8.8.1 on my laptop
Starting from v8.0 Elasticsearch supports both exact and approximate k-nearest neighbours search for embedding vectors using the hierarchical navigable small world graph (HNSW) algorithm. Langchain in turn supports various vector databases such as OpenAI Pinecone, ChromaDB or Elasticsearch. The advantage of Elasticsearch over e.g. Pinecone should be obvious: It’s an enterprise-ready, battle-tested search engine, and it does not cost you a lot of extra money if you host it on your own servers.
Initially, I tried to download and install both Elasticsearch and Kibana v8.8.1 as containers and then run them on Docker on my MacBook Pro. How should I say: I failed. Not sure what was wrong. Initially I thought Kibana or Elasticsearch was running out of memory, but after making some changes it seemed Kibana somehow could not properly communicate with Elasticsearch. At that point I gave up and decided to install them directly on my laptop, so I would not have to fiddle around with container settings too. That worked much better, and after some time I had a running Elasticsearch and Kibana instance.
One thing that I struggled quite a bit with: Elasticsearch by default enables SSL (https) connections. Unencrypted connections (http) are blocked by default. Great for security, not so great for local development. So, even for a connection from your Python code running localhost to Elasticsearch running localhost I had to fiddle around with security certificates.
First, I had to re-create the existing SSL security certificates provided by Elasticsearch into a different format. Python required a .pem file, whereas Elasticsearch provided a http.p12 file. However, during the conversion process I required first some obscure “XPack import password” or whatever that was used behind the scenes by Elasticsearch. Note that this password had not been disclosed to me during the installation process itself. With some Google Fu I finally found the right command:
elasticsearch/bin/elasticsearch-keystore show xpack.security.http.ssl.keystore.secure_password
Equipped with the import password I could then follow this tutorial. The key command to convert from .p12 to .pem file is:
openssl pkcs12 -in elasticsearch/certs/http.p12 -cacerts -out elasticsearch/certs/python_es_client.pem
After that I could copy the python_es_client.pem file to my local project. As we’ll see later, I had to use this certificate file in my Langchain code to access Elasticsearch.
Step 3: Create embeddings vectors using OpenAI embeddings API and Langchain
Now I was ready to create embedding vectors for my recorded dreams.
Note that I was using Langchain v0.0.196. At the time of writing Langchain is under heavy development and changes on a daily basis. It is not guaranteed that interfaces remain the same over the next few weeks or months. Furthermore, due to the heavy development it is not infrequent that some APIs are somewhat inconsistent and don’t exactly follow a syntax as you’d expect from some other examples. If something does not work, check the docs, or even better: Check the code itself including the unit tests.
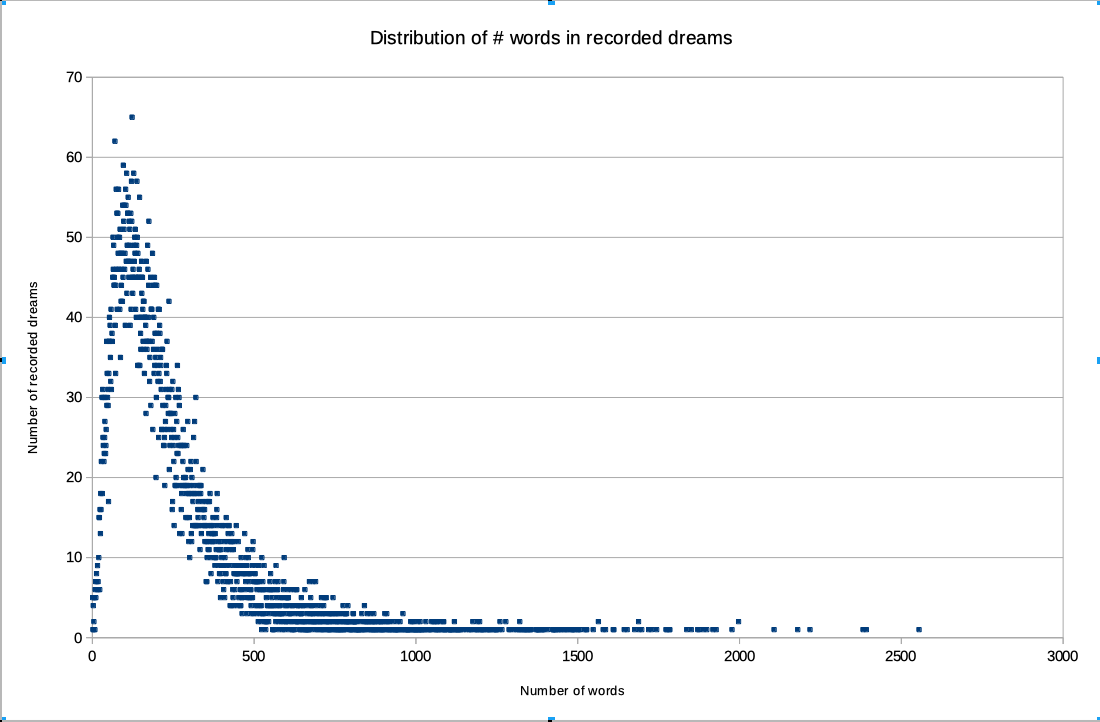
First, I wanted to know the average and maximum number of words per document, because that would ultimately determine the costs for using the OpenAI Embeddings API. I created a small script to tokenize my recorded dreams using the Space library. Below is a chart with the results. As we can easily spot the vast majority of recorded dreams contained less than 2000 words, and many recorded dreams contain actually less than 500 words. Ultimately, I ended up paying just ca 2.70 USD for indexing all >13k dreams using the text-embedding-ada-002 model, so really affordable.
Here is the code to create the embeddings and immediately index them with Elasticsearch:
File openai_api_key.py:
apikey = '<OpenAI API Key>'
This just contains the (paid) OpenAI API key I generated through the OpenAI website. It might be wise to set an upper financial limit to your monthly payments in case you’re dealing with a little larger number of documents you want to work with.
File dream-indexer.py:
from langchain.embeddings.openai import OpenAIEmbeddings
from langchain.text_splitter import RecursiveCharacterTextSplitter
from langchain.vectorstores import ElasticVectorSearch
from langchain.document_loaders.csv_loader import CSVLoader

from open_api_key import apikey


def main():
    # First line contains the headers
    loader = CSVLoader(file_path='./data/dreams-collection-all.csv', csv_args={
        'delimiter': ',',
        'quotechar': '"',
        'fieldnames': ['Page', 'Dataset Index', 'URL', 'Post ID', 'Post Author', 'Post Date', 'Post Title', 'Post Content']
    })

    # Use Langchain CSV loader to load data to memory
    data = loader.load()

    # Split documents into meaningful units to index, i.e. first into paragraphs,
    # then into sentences, then into words etc.
    text_splitter = RecursiveCharacterTextSplitter.from_tiktoken_encoder(
        # I did not set any specific values, but according to docs default values are:
        # chunk_size=1000, chunk_overlap=0
    )
    documents = text_splitter.split_documents(data)

    # Create the actual embedding vectors using the OpenAI embedding API
    embeddings = OpenAIEmbeddings(openai_api_key=apikey)
    #print(embeddings)

    # Wire everything together and index the embedding vectors into the local Elasticsearch
    db = ElasticVectorSearch.from_documents(
        documents,
        embeddings,
        elasticsearch_url="https://<ES_USER>:<ES_PASSWORD>@localhost:9200",
        index_name="dream-db-index",
        ssl_verify={
            "verify_certs": True,
            "basic_auth": ("<ES_USER>", "<ES_PASSWORD>"),
            "ca_certs": "./src/certs/python_es_client.pem",
        }
    )
    print(db.client.info())


if __name__ == "__main__":
    main()
The approach goes like:
- Use Langchain’s
CSVLoaderto load the CSV file containing forum posts from disk. Every post contains multiple metadata like ID, URL etc. The actual content of the post is in the last field ‘post_content’. Note that I was not dropping any metadata, but also indexed that. Later on, this was helpful for e.g. obtaining the post’s original URL while doing Q&As. On my laptop everything fit nicely into memory, so no issues there. - Then I used a RecursiveCharacterTextSplitter to split every post to be indexed into sections, sections into sentences, sentences into words, and words potentially into tokens. With a RecursiveCharacterTextSplitter a section typically equates a paragraph (defined by a double line break “\n\n”), but there is a lot more to it. There are two default parameters which I also did not modify:
chunk_sizeis the maximum number of character length per section that is allowed. If a section (or paragraph) is longer than the number of characters, the section is simply truncated. The default value is 1000 characters.chunk_overlapis the number of characters that sections are allowed to overlap. This can be important to set if one must be very sure not to lose any text while embedding or indexing. The default value is 0 characters overlapping. In fact, tokenization is a very complicated problem in natural language processing. I did not bother about the details of the implementation, but you could use Spacy or NLTK and similar libraries for your purposes. You can use the from_tiktoken_encoder() factory function to create a CharacterTextSplitter instance. - Next, we create a wrapper object for the OpenAI embeddings API, handing it the API key.
- Finally, we assemble everything together using the ElasticVectorSearch class. By calling the from_documents() function we actually initiate both the embedding calls and subsequent indexing to Elasticsearch. Replace <ES_USER> and <ES_PASSSWORD> with the Elasticsearch username and the user’s Elasticsearch password. Also, notice the use of the
ssl_verifyparameter plus the usage of thehttpsURL we are pointing to. It took me a very long time to figure out the exact usage of the ssl_verify parameter, and ultimately I realised that apparently the underlying implementation had changed in the meanwhile. Notice that we are handing it a reference to the .pem SSL certificate that we created previously. In case of doubt about the exact syntax of the ssl_verify parameter make sure you check the corresponding unit test case. Some authors out there recommend to entirely disable SSL, or even more extreme, disable secure connections altogether. Obviously, in a secure environment like your laptop that’s not an issue but there’s a danger that this gets forgotten and the code ends up in production somehow. Better to do it right from the beginning. - At the end, we print few infos on the Elasticsearch index we just created. Just for our own info.
The unzipped CSV file containing all dreams was roughly 19 MB on my disk. Using the OpenAI text-embedding-ada-002 model resulted in an Elasticsearch index with >13k vectors of 1536 dimensions resulting in a total index size of roughly 300-400 MB of disk space. So, easily doable on a modern laptop.
Awesome! What’s next?
Step 5: Create a semantic search engine and Q&A bot
Finally, we will be building a simple REST API around our bot through which we can run queries. The API will offer two HTTP POST endpoints, one for a more traditional semantic search on documents that only returns the documents themselves, and a second one with a more advanced Q&A bot that understands ChatGPT like complex user inquiries. The general approach is:
- Every query we send first needs to be translated into a vector with the help of the OpenAI embeddings API.
- When we have the vector, the ElasticVectorSearch or the RetrievalQAWithSourcesChain can search through the vector database to find the most similar documents and provide an answer.
File server-app.py:
# Start process from a terminal with uvicorn:
# uvicorn app:app --reload

from fastapi import FastAPI
from langchain.chains import RetrievalQAWithSourcesChain
from langchain.chat_models import ChatOpenAI
from langchain.embeddings.openai import OpenAIEmbeddings
from langchain.vectorstores import ElasticVectorSearch

from openai_api_key import apikey

# OpenAI embeddings API wrapper
embedding = OpenAIEmbeddings(openai_api_key=apikey)

# Reference to the Elasticsearch vector database to query
db = ElasticVectorSearch(
    elasticsearch_url="https://<ES_USER>:<ES_PASSWORD>@localhost:9200",
    index_name="dream-db-index",
    embedding=embedding,
    ssl_verify={
        "verify_certs": True,
        "basic_auth": ("<ES_USER>", "<ES_PASSWORD>"),
        "ca_certs": "./src/certs/python_es_client.pem",
    }
)

# Instance of a Q&A bot.
chain = RetrievalQAWithSourcesChain.from_chain_type(
    llm=ChatOpenAI(openai_api_key=apikey, temperature=0),
    chain_type="stuff",
    retriever=db.as_retriever(),
    return_source_documents=True)


# Create a FastAPI REST server
app = FastAPI()

# REST API that does not do a lot, but helpful to see if everything's
# running fine.
@app.get("/")
def index():
    return {
        "message": "Hello World!"
    }

# REST API for semantic search. This will return documents that are "similar"
# to the given search terms but not understand ChatGPT-like queries.
@app.post('/similarity')
def ask(query: str):
    result = db.similarity_search(query)
    return result

# REST API for questions and answers. This will be able to interpret ChatGPT
# like conversational complex queries.
@app.post('/qa')
def ask(query: str):
    result = chain({'question': query}, return_only_outputs=False)
    return result
Let’s look at the details.
- First, we create again a wrapper object around the OpenAI API using the
OpenAIEmbeddingsobject and handing it the api key as a parameter. - Next, we create again an
ElasticVectorSearchobject which serves as an interface to our local Elasticsearch instance. -
Here comes the really cool part. We are calling
RetrievalQAWithSourcesChain.from_chain_typeto create an actual Q&A bot which can answer complex queries about our data. There also exists a simpler object called RetrievalQA which does not return references to the documents found. In many situations you however want to have references to the underlying documents, so in case of doubt you can check yourself what the bot is telling you! What was very confusing to me: in Langchain v0.0.196 there exists apparently multiple ways how to execute the actual Q&A query. Depending on the path you follow the syntax might look significantly distinct. important difference in syntax between using RetrievalQA vs RetrievalQAWithSourcesChain. Compare the official docs here and here. Notice how they differ between RetrievalQA and RetrievalQAWithSourcesChain classes. One expects you to callqa.run('my query')whereas the other one expects you to callchain({'question': 'my query'}, return_only_outputs=False. Very different syntax indeed.# RetrievalQA according to docs here: https://python.langchain.com/en/latest/modules/chains/index_examples/vector_db_qa.html?highlight=retrievalqa query = "Who let the dogs out?" result = qa.run(query) print(result) # RetrievalQAWithSourcesChain.from_chain_type according to docs here: https://python.langchain.com/en/latest/modules/indexes/vectorstores/examples/weaviate.html?highlight=retrievalqawithsourceschain#question-answering-with-sources query = "Who let the dogs out?" result = chain( {"question": "Who let the dogs out?"}, return_only_outputs=False, ) print(result)Hopefully, this will be improved in a future version of the library.
Alright, we can now run our application with uvicorn v0.21.1. This will open a website running on https://localhost:8000/docs. From there, we can run calls to our APIs. Obviously, not yet for end users, but great for quick testing of our two semantic search and Q&A services.
uvicorn server-app:app --reload
Here, server-app refers to the name of the server-app.py file, whereas app refers to the FastAPI server instance variable defined within the file. The server is now available through http://localhost:8000, calling it returns:
{"message":"Hello World!"}
Things become a little more interesting if you navigate to http://localhost:8000/docs. This will open an OpenAPI/Swagger-like webpage through which you can call the REST API endpoints from a UI.
Here’s what you should see:
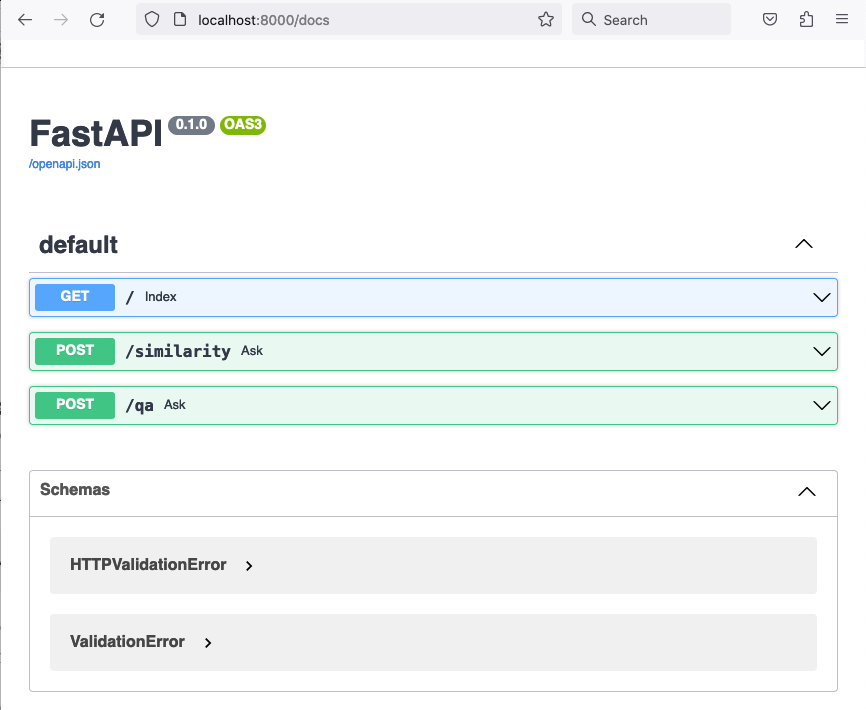
Let’s use the Q&A bot to post this query:
Find me all the dreams containing an animal, then provide me a list with their activities.
Here’s the result:
{
  "question": "Find me all the dreams containing an animal, then provide me a list with their activities.",
  "answer": "Dream 1: Animals running past the dreamer on a meadow. No specific activity mentioned.\nDream 2: Dead cats on the ground in a forest, vultures on a tree, a white duck in the dreamer's house. Dreamer tries to catch the duck but is afraid of it. Later, dreamer is in a classroom with her dogs and mother, and the girls in the class talk to her about her pregnancy. No specific activity mentioned for the animals.\nDream 3: Dreamer frequently dreams of animals, sometimes with a threatening aspect. In one dream, the dreamer is in an apartment with a cage of guinea pigs, and a dog comes in. Dreamer is afraid of the dog but picks it up and it turns into a cat. In another dream, dreamer is surrounded by lions, leopards, elephants, crocodiles, and possibly snakes, and they want to eat her. Dreamer tells them she wants to live. No specific activity mentioned for the animals in the first dream, but in the second dream, the animals want to eat the dreamer. \n",
  "sources": "./data/dreams-collection-all.csv",
  "source_documents": [
    {
        "document": "...document content 1..."
    },
    {
        "document": "...document content 2..."
    },
    {
        "document": "...document content 3..."
    },
    {
        "Document": "...document content 4..."
    }
  ]
}
Imagine how difficult it would be to achieve this with a traditional text search engine. Fantastisch!
Note that the number of returned documents is limited to four in our example. This means, the returned answer or the returned documents are neither exhaustive nor necessarily complete. This is important to understand. In a semantic search engine there is no ultimate measure of correctness. Therefore, as a user we have to specify how many results we want to inspect. Of course, we end up paying for every query due to the usage of the OpenAI service. For this reason, there are multiple chain classes that have a max_tokens_limit and reduce_k_below_max_tokens fields which can be used to increase or decrease the number of returned tokens. If your budget is bigger you can afford increasing the limits a bit, but you’ll end up paying more.
In case you need to measure more thoroughly the quality of the Q&A system there is also a way how to evaluate the returned answers using QAEvalChain.
Conclusion
When I find some time I’ll add a simple Streamlit interface. Making calls from the FastAPI UI is not very user-friendly, and creating something better looking in Streamlit really does not take a lot of time. For some inspiration have a look at this YouTube tutorial. Also, I want to learn more about the agent capabilities of Langchain. There are multiple videos on YouTube on this topic.
Another thing I believe will soon be needed is memory for my semantic Q&A bot. One issue that I realised soon was that the bot really has absolutely no memory of what was just said a moment before. For example, I ran a pretty intelligent query, and then wanted to build upon the results. The bot immediately after querying had forgotten about my previous query, hence I always needed to design the queries in a way that they constitute the “union” of my previous and my current intent. The Q&A queries may become pretty long with many conditions: “Find me all documents that contain XYZ or ABC but not QRS, then provide me a list where condition is that bla bla bla.” It would be a lot easier to first run some parts of this query, and then tell the bot to remember what it just returned and build on it. Obviously, this could also create some errors by the user forgetting about the statefulness of the bot, so ideally there should be a functionality to enable or disable state.
One thing I noticed during this work was how useful a semantic Q&A bot could be for hermeneutical-qualitative analysis of texts. In fact, I believe it could constitute a bridge between qualitative and quantitative text analysis. Imagine you have a document set of transcriptions of interviews you conducted. Going through all of them manually is a huge amount of work. A semantic Q&A bot allows you to get specific answers within seconds. Also, if the bot returns the document sources it’s easy to cross-check the veracity of the bot’s claims, although it might still have missed some important results. As we all know, LLMs do make mistakes sometimes.
References
- Dylan Castillo’s blog post: https://dylancastillo.co/semantic-search-elasticsearch-openai-langchain/
- Connecting from Python to Elasticsearch: https://cdax.ch/2022/02/20/elasticsearch-python-workshop-1-the-basics/
- OpenAI APIs: https://platform.openai.com/docs/guides/embeddings
- ssl_verify parameter in ElasticVectorSearch.from_documents function: https://github.com/hwchase17/langchain/blob/master/tests/integration_tests/vectorstores/test_elasticsearch.py
- Langchain Crashcourse - Youtube video by Nicholas Renotte: https://www.youtube.com/watch?v=MlK6SIjcjE8